Meanwhile, back at the Sewing Ranch...I did around a dozen kitty pads for a girl scout who is trying to earn her Gold Award collecting supplies and materials for a cat shelter. One of the projects she was doing was making these kitty pads for them to put on shelving in the shelter in the play room. Simple project - flannel outside in a long rectangle, batting on the inside for cushy comfort for nap attacks. What wasn't so simple was the little bit of quilting they asked for so that the batting didn't shift while the pads were being washed. I never expected that to be so difficult to get through the sewing machine - so yay again for having gotten the Janome with the walking foot. It was fun to look at the wild colors & whimsical prints she picked out:
Then back to the maternity clothes (which aren't in bright colors....yet - but stay tuned) until suddenly I got a call from my nephew's wife, desperate for help with her sons' Halloween costumes for a playdate. She told me what she wanted to do, and why she couldn't get it done there, and we arranged for her to drive down the next day with the boys and the outfits. Simple enough idea (and perfect for her boys), but difficult when you factor in how busy the boys are - one is in almost constant motion - and her lack of crafting supplies. It's great to be the Auntie who is the resident Crafting Queen! So not only did I get a wonderful visit by some people I really care about, I also got to "play":
 |
| Our lovely see the blue hair better, LOL! |
Got an email from the Refashion Co-op - it's been so darned busy here that I haven't gotten around to any of my refashions and haven't posted there in a long while! Thankfully, they're not going to turn me out on my ear! So I managed to sneak in a couple of refashions yesterday and today, ones that I'd been meaning to get finished for quite some time. I'll post the second one in awhile, but here is the first one:
 |
| Some 99 Cent Store t-shirts, along with one wild print clearance t-shirt from Kohls and some brown jersey fabric from the dollar bin at my local fabric store. |
 |
| The Anthropologie inspiration. |
 |
| A little bit of chopping, a lot of playing, and I found a scheme I liked. |
 |
| Yes, things really do get this cockeyed in my workroom. Serging the cut up swatches back together. |
 |
| Match the seams from the cut up t-shirts when- ever possible when sewing them back together. |
 |
| Um, yeah. Some of the panels I cut were bigger than the other panels I cut. But not to worry. As long as I don't forget, I can serge down that side and cut off the excess. |
 |
| Serging that excess chunk off while running the seam down that sleeve. |
 |
| And onwards, down the sides. |
 |
| Semi-finished. Now for the hems and the neckline trim - you don't have to settle for whatever neckline the original t-shirt had. Here I chose to make it into a v-neck. |
 |
| When putting a fabric band onto a t-shirt, it's a good idea to stretch the band, especially in the front. That will help it lay flat properly. |
 |
| A little bit of stretch in the back neckline area. Not quite as much as in the front. |
 |
| Matching the ends at the center back of the neckline. Mark with pins or chalk. |
 |
| Sew a standard seam with a regular sewing machine. |
 |
| Open it and press it flat - helps to keep this area from becoming too bulky. |
 |
| Sew about a 3/8 inch seam while stretching the band (don't pull too hard and stretch the t-shirt, too). |
 |
| Stitching that v-neck which is stretched out horizontally - now it's more obvious why the stay-stitching is so important. |
 |
| Trim the seam down to about 1/4 inch all the way around. |
 |
| Urgh. That original seam is going to be too bulky - so I trimmed that down before the next step: |
 |
| Flip the neckband up..... |
 |
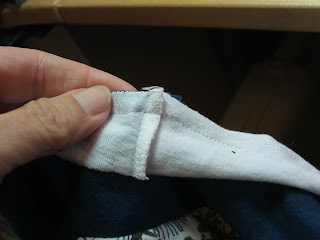
| ...and then over the seam allowance. Pin it so that it sits just beyond the seam stitching. |
 |
| Notice my pins are on the inside. That way I can make sure I will catch the extra fabric in the next stitching. |
 |
| All the overlap is now caught in that stitched line - but you'll notice that the v-neck is looking decidedly....round. Here's an easy fix: |
 |
| Fold the shirt in half at the point of the v-neck, and take special note of where your stitching is for the neckband. That's where you want your next stitch line to end. |
 |
| Here is the finished t-shirt. |
That's it for this time!


That is a pretty good idea for a Tshirt!
ReplyDelete(and thanks so much for your lovely comment on my skirt)