Monday, December 26, 2011

On Vacation...NOT!

Hoo, boy.  December has been busy, even with my maternity client taking a vacation for the month.  It was probably a good thing, too, since I had orders coming in left and right and was literally working until about an hour before Midnight Mass on Christmas Eve!  Even so, there were a couple of things I didn't get done that I was really wanting to do, but....you have to look at things by what you were able to accomplish, not necessarily by what you were NOT.

This was the month for embroidery orders, that's for sure.  There were more than a few large orders for the appliqued onesies this month for stores, but also some requests for custom embroidered ones:

TOO CUTE!
(I have to admit this was a
personal favorite - my initials
were E.L.F. before I got married.)
Ok, the Sweet Tart Lab client and I were scratching
our heads over this one.  All we could
figure was maybe the kid's name
was Chase?


Working away on the onesies orders to be done by Christmas, my client was suddenly struck with the realization that she needed gifts for the little girls from her daughter's preschool who were coming over for a little party & dinner.  She had purchased these cute PJs for each of them, and asked me to customize them for the girls.  Hopefully she'll be able to forward a photo with the three of them in matching tops:


Following that came the Great Blanket Glut of 2011....LOL!

Two for the Sweet Tart Lab:


One for a good friend (band mom), whose son wanted to give his girlfriend something unique for Christmas:

This one came bundled from the store in a black belt-like
ribbon - by the time I was done stitching and re-packaging
it in the black ribbon it looked like I had stuffed Santa
into the shopping bag, LOL!!!!


Another good friend (colorguard mom) came over with her daughter, with a Girl Scout gold award project I'll be helping her with (stay tuned - should be in the next post), spied the above blanket, and the lettering on the PJs and ordered this for her boyfriend:

She designed this herself, with the treble clef subbing as
the "&" sign, since they have been performing together
for four years, and dating for nearly that long!

A couple months ago I embroidered about 19 cheerleading warmup jackets for someone who was referred to me by yet another band mom (anyone else starting to hear the theme song from "It's A Small World"?).  When that project was done, she asked if I were able to do custom blankets.  I love designing things with the software I bought to go with my Husqvarna/Viking machine - and this was something I could totally sink my teeth into - custom design & digitizing (yeah, baby!).  She is hoping that when the other hockey team moms get wind of this custom blanket, she'll be bringing me more orders for them:

Her son's team is in Anaheim, so they are the Anaheim Junior Ducks.
They swiped the logo, not me.  (Whistles off into the distance....)
This is the coolest fabric I have stitched on to date:  faux suede with a faux
shearling underneath.  Scary, but it embroidered beautifully.  I finished it
with black satin blanket binding.  The photo totally doesn't do it justice.

Her daughter also goes to the same high school as all the aforementioned band kids - only she plays on the girl's volleyball team.  She had a school blanket already, but needed it customized for her daughter.  

There's a story you need to know about this one.  I hunted for quite some time, looking for just the right clip art image to digitize for the volleyball on the blanket.  I tried one after the other, but a lot of them digitized like something out of a caveman's nightmare - big, misshapen, and scary looking.  Weird.  FINALLY I lucked onto one that came through the digitizing looking familiar, at least - success!  The blanket, like a lot of the others shown here, is very plush fleece.  The Sewing Assistant fell in love with it immediately.  While I was hooping it up on one side, he had the other side in his mouth, purring, kneading kitty biscuits, refusing to let go.  I finally got him disengaged, and took it over to the machine to start the embroidery.  About five minutes into it, he came flying over the piano and landed with a thud on the blanket, fully intending to take up where he had left off.  I shooed him away again (and boy, can he grumble) and started the next color block, only to realize that he had knocked the hoop out of alignment by about an 1/8th inch.  OY!  I didn't realize it until the entire block (about 3,000 stitches!) was done, and I wasn't about to try to clip all those stitches out of a plush fleece blanket and try to start over.  UGH.  I let the rest of the embroidery stitch out, only to realize that her name at the bottom was going to run into the existing lettering on the corner of the blanket.  

The Sewing Assistant is fired, once again.  
I iz hiding.  You can't see me. 

Not enough time to start over.  NOT going to go out and buy another blanket for the client - school was out by this time and no one in the office with school merchandise!  I had to make do and fill in the stitching afterwards with some tiny zig-zags (and set the name off with darker thread):

This 1/8th inch is going to haunt me for my entire career.
However long that lasts. 
I didn't get another photo of it after I was done, but the client was good with the fix (the volleyball looked fine - and she totally understood the Sewing Assistant's strange fascination with this particular blanket).  

Are you exhausted yet?  I am.  But wait......there's more.....

Seven altered nightgowns for a neighbor's mother.  One custom fleece jacket for another neighbor (which I didn't get done before they left to visit that family member - argh!).  And one very special custom order for my son's girlfriend.  This one was totally icing on the cake - a jeans jacket refashion that he designed himself, using a thrift shop jacket he found in her size.  I bought the fabric for the refashion with a Joanns coupon I had (score!) and used some embroideries I bought from Embroidery Library with a coupon from them (score some more!) to update the look:


Before


After
Maneki Neko - with sushi!  Nom!!


He wanted to put a Yin Yang symbol somewhere on the
jacket.  I designed this one with the paw prints
to go with the Maneki Neko - came out really cute!


Happy recipient - that's what it's all about!  Hope you all had a very Merry Christmas!


Saturday, December 3, 2011

A Little Gift (And a Happy Cat Dance)

I like being busy, but it looks like things might be slowing down, at least for one of my clients for a while.  Which is okay, because it's that time of year again and I'm already doing last-minute gifts.  I wanted to post about this earlier, but it would have "let the cat out of the bag."  Or maybe into it?

IN THE BAG!


Needed to give a big thank-you on a small budget to some of the volunteers who helped me with the huge band project (see here) - always a brain-bender to figure out what to give that won't break the bank, but won't look cheap, either.

Embroidery Library to the rescue.

I love Embroidery Library - if you have an embroidery machine, and you don't know about this company (or its affiliate, Urban Threads), you need to click on over there.  Right.  Now.  Not only does Embroidery Library have some of the best looking embroidery files out there, they are well-digitized, stitch out perfectly (almost all of the time), and are VERY reasonably priced.  (If you are a bit on the wonky side, like me, you'll love Urban Threads for the same reasons - and add one more:  they have some of the quirkiest embroidery files on the net.)  They both have great sales.  They both have great specials.  And they BOTH give out freebies, so there is no excuse not to try out one of their great embroideries.  This week, Embroidery Library has a great file for free, and it came at just the right moment - problem solved!  I picked up some kitchen towels at my local Dollar Tree (you have to select very carefully - not all of them are things I would consider giving, even with some fancy embroidery on them....) and zoomed home to stitch up some thank-yous:

Plain Dollar Tree kitchen towel on the left.
Embroidered embellishment on the right - this was a freebie!  Amazing!
All three recipients were thrilled and very grateful - I just hope they know how much I appreciated their going above & beyond to help me out this season!  (N., S., and C. - if you're reading this, I will love you always!  S. - Thank you Spoon Much!)

So many blankets....all for me, right?
Still working on Takara Baby blankets - Neko adores the fabric and it's all I can do to keep him out of the stash when they hit the house.

He is such a goof.  Orders for the onesies for Sweet Tart Lab are exploding through the roof, and he has to personally inspect every order that comes through.

Even when he thinks no one is looking.


Okay, let me start counting all the onesies......
one,
two,
three.....forty-leven.....
(....and dance like no one is watching! La, la, la, la, la.....)

Once in awhile I get to do some custom embroidery for Sweet Tart Lab.  This blanket was sent to her by a client who wanted some personalization done on it for her son.  She sent one that she'd had done for her daughter previously, and wanted the text to match on her son's new blanket.

Yoiks.

Fortunately, I happened to have the exact same font, so all went well.

HAD to place it next to the heart, between the two boats.
Thought it looked really nice, there.  
I love my embroidery machine.  Thank you, Husqvarna Viking!  I had a chance recently to test-drive their newest machine, the Diamond Deluxe.  Totally drool-worthy.  (Saving my pennies.)

Final Count for November:
22 Velour baby blankets
79 Onesies (most appliqued, one custom embroidered)
7 Maternity items
19 Cheerleading Jackets
1 PJ repair
1 Knit shirt repair
6 Placemats, 6 Napkins, 1 Table runner repair (finely woven from Guatemala - had to secure the fraying edges)
3 Thank-you towel gifts


Tuesday, November 22, 2011

Where's Mine?

Ah.  The Sewing Assistant is at it again.  I haven't been posting much because I'm so busy with client orders, most of which I'm reluctant to post in case someone steals an idea.  That wouldn't be cool, but it does happen. There is one client, though, that I think the Sewing Assistant would marry if he could.  She custom dyes and creates blankets & things from stretch bamboo velour, which is so ridiculously plushy you just want to spend all day curled up with it, and let the rest of the world go hang.  (TakaraBaby.com - click on Photo Gallery to see oodles and oodles of custom dyed awesomeness. When you get there, click on her Flickr stream and check out DS Co-op 2011 and Stripes.)

So you can understand and possibly forgive Neko for his obsession with this client and her goods.  I think these photos explain a lot:

This is NOT for client.  This is for the Sewing Assistant.
You MUST be mistaken.  Check the order again, please.

Apparently, you did not hear me correctly, Mom.  MINE.
Sleeping on three blankets, pins and all.  Right in back of
the sewing machine, so I couldn't move the fabric through.
Once again, the Sewing Assistant is fired.

And he still did not get the memo.

It was at this point that I begged the client to please give me
scraps of any color, any size, so I could piece together a
decoy blanket to distract him long enough to work on the real ones.

(Drool.....)  She brought this big blanket here for me, right?
(Calculating....speed.....distance.....jump strength.....trajectory...)

Mom keeps shooing me off my big blanket.  I KNOW there are
some scraps in here for me.  I just KNOW it.

Maybe they are just a little further in.....

Cool stringy thingies.  But no scraps.

Sad face.  The client forgot to bring the scraps this time.

(Recalculating......)

So, like I said.  This blanket is.....

...MINE.  


Sunday, November 6, 2011

Craft Fail = Refashion Opportunity

Ever have one of those moments?  When you're in a craft store or fabric store and something just jumps off the shelf and into your hands, your mental gears start turning and you're just positive you can make something really special?  So exciting!  You run home, find one of the thrifty t-shirt purchases you've been making for moments just like these - beautiful fabric, nice shape, and only a dollar at the county swap meet - just the right thing to dress up with the iron-on transfer you just bought (at full price, because it was so pretty).


It says it can be ironed onto light or dark color fabric, as it has a white background so it should all show up. Out comes the beautiful black t-shirt.  I follow the instructions to the letter and wait for the results.  I can't wait to wear this out and let people know I did this!  :)

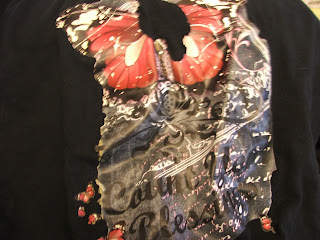
So imagine my distress when the iron-on becomes something more of a nightmare than a dream come true:

UBER CRAFT FAIL!


It ironed on, but only in certain areas. It bubbled.  It peeled.  But not everywhere, and certainly not when I tried to pull the whole thing off the t-shirt I was determined to save, even though it only cost a dollar.  It was the principle of the thing.  

Thoroughly disgusted, I tossed the shirt aside in my workroom and moved on to some other project.  I threw the shirt into the trash the next time I ran across it.  Then rescued it from there again minutes later.  I so could not admit defeat.  It's a problem I have.  

Months later, I was straightening up in my workroom making a spot for my new (used) purchase when I find another t-shirt I had found at a 99 cent store.  It was sized for a small child, and it was the only one of its kind, but I just had to have it - I figured I could do something with it eventually.  The lightbulb went on - the graphic that had drawn me to this t-shirt would just about cover the meltdown on the black t-shirt - I might be able to save it after all!

Stitching that is supposed to look like ribbons.  Only I forgot to
stabilize the upper t-shirt fabric before I pinned it and started
sewing.  Oh, well - Halloween was coming up and I figured it
would look more....Frankenshirt-ish.  

Oof.  More wonky stitching.  But it actually complemented
 the graphics.  

It needed a bit of something else.  Something to go with the red.
When you have nothing to lose, especially when working with
one humongous craft fail and two one-dollar t-shirts, go for
the gusto.  Go ahead and experiment with some of those fun
decorative stitches you have on your machine.
But next time, use some iron-on interfacing for stability.  :)

Looks appropriately Halloween-ish.

Strangely enough, all the mishaps seemed to
come together as a success at the end of the day.

Yeah.  Mostly.  


Saturday, October 22, 2011

A Batch of Colorful Sewing Work

 Halloween is just around the corner, so I decided to have some fun "decorating."  With all the sewing orders I've had lately, though, all I had time to do was watch a scary movie with my younger son, who is a bit under the weather, and to change the ringer on my cell phone to that classic maniacal laugh that Vincent Price was so well known for.  Right after we finished the movie, though, I just about jumped out of my skin when my front pocket suddenly emitted peals of Grade B Horror Movie cackles - my other son was calling and I'd totally forgotten I'd changed the ringer.  Serves me right for watching Paranormal Activity 2 (and let's hear it for premature senility....).

Meanwhile, back at the Sewing Ranch...I did around a dozen kitty pads for a girl scout who is trying to earn her Gold Award collecting supplies and materials for a cat shelter.  One of the projects she was doing was making these kitty pads for them to put on shelving in the shelter in the play room.  Simple project - flannel outside in a long rectangle, batting on the inside for cushy comfort for nap attacks.  What wasn't so simple was the little bit of quilting they asked for so that the batting didn't shift while the pads were being washed.  I never expected that to be so difficult to get through the sewing machine - so yay again for having gotten the Janome with the walking foot. It was fun to look at the wild colors & whimsical prints she picked out:


After that was done, it was on to the onesies for Sweet Tart Lab, which I completely forgot to photograph.  Which is a shame, since one of the shirt styles isn't offered in their Etsy store but was really fun to sew as it involved a colorful mix of fabric patterns.  Maybe if I get to do that same style again, I can post a photo of one.  If you go to this link, though, you can see other shirts I've sewn there - aren't their designs cute?

Then back to the maternity clothes (which aren't in bright colors....yet - but stay tuned) until suddenly I got a call from my nephew's wife, desperate for help with her sons' Halloween costumes for a playdate.  She told me what she wanted to do, and why she couldn't get it done there, and we arranged for her to drive down the next day with the boys and the outfits.  Simple enough idea (and perfect for her boys), but difficult when you factor in how busy the boys are - one is in almost constant motion - and her lack of crafting supplies.  It's great to be the Auntie who is the resident Crafting Queen!  So not only did I get a wonderful visit by some people I really care about, I also got to "play":

These came out too cool!  Printed these out onto t-shirt
transfer paper, ironed them onto white cotton fabric,
ironed some fusible interfacing onto the back, and then
satin-stitched them to the turtlenecks she brought.

Our lovely victim model, Alex - wish you could
see the blue hair better, LOL!

Got an email from the Refashion Co-op - it's been so darned busy here that I haven't gotten around to any of my refashions and haven't posted there in a long while!  Thankfully, they're not going to turn me out on my ear!  So I managed to sneak in a couple of refashions yesterday and today, ones that I'd been meaning to get finished for quite some time.  I'll post the second one in awhile, but here is the first one:

Some 99 Cent Store t-shirts, along with
one wild print clearance t-shirt from Kohls and some
brown jersey fabric from the dollar bin at my local fabric store.
The Anthropologie inspiration.

A little bit of chopping, a lot of playing, and
I found a scheme I liked.  

Yes, things really do get this cockeyed in my workroom.
Serging the cut up swatches back together.

Match the seams from the cut up t-shirts when-
ever possible when sewing them back together.

Um, yeah.  Some of the panels I cut were
bigger than the other panels I cut.  But
not to worry.  As long as I don't forget, I
can serge down that side and cut off
the excess.

Serging that excess chunk off while running the
seam down that sleeve.


And onwards, down the sides.

Semi-finished.  Now for the hems and the
neckline trim - you don't have to settle for
whatever neckline the original t-shirt had.  Here I chose
to make it into a v-neck.  

Pinning a fabric band I cut from a t-shirt to the cut v-neck.
Here you can see the v-neck of the shirt spread apart until
it's almost a horizontal line.  It's a good idea to run some
stay-stitching around the neckline first.  I placed this seam right
into the v of the shirt.  In retrospect, I shouldn't have - it
made it a bit bulky for the next step.


When putting a fabric band onto a t-shirt, it's a good idea to
stretch the band, especially in the front.  That will help it
lay flat properly.

A little bit of stretch in the back neckline area.  Not quite
as much as in the front.

Matching the ends at the center back of the neckline.  Mark
with pins or chalk.  

Sew a standard seam with a regular sewing machine.

Open it and press it flat - helps to keep this area from
becoming too bulky.

Sew about a 3/8 inch seam while stretching the band (don't
pull too hard and stretch the t-shirt, too).

Stitching that v-neck which is stretched out horizontally -
now it's more obvious why the stay-stitching is so important.

Trim the seam down to about 1/4 inch all the way around.

Urgh.  That original seam is going to be too bulky - so I trimmed
that down before the next step:
Flip the neckband up.....

...and then over the seam allowance.  Pin it so that it sits just
beyond the seam stitching.

Notice my pins are on the inside.  That way I can make sure
I will catch the extra fabric in the next stitching.

From the outside, "stitch in the ditch" - as close to the
neckband as possible.  As long as you have left the heads of
the pins beyond the edge, you should be able to see them
and remove them before you break your needle attempting to
sew OVER them.  

And....even us more experienced seamstresses miss the
overlap sometimes.  No worries.  Pin again, and stitch again
over the last stitch line.  Check to see if you caught all the overlapped
neckband in your stitching.  

All the overlap is now caught in that stitched line - but you'll
notice that the v-neck is looking decidedly....round.  Here's
an easy fix:

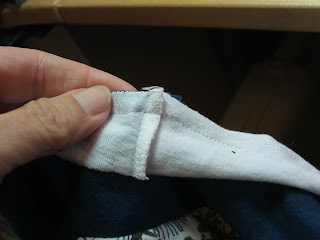
Fold the shirt in half at the point of the v-neck, and take
special note of where your stitching is for the neckband.
That's where you want your next stitch line to end.  

Start from an angle - maybe not quite so acute as mine -
that could draw the front neckline in a bit too far.  Don't stitch
beyond the neckband stitch line - if you do, you'll get a strange looking
pucker at the point of the v when you're done.
Here is the finished t-shirt.  

A close-up on that cheater's miter.  Needs a good
pressing - I recommend pressing every seam,
every time - your work will look so much better.
This does look like the angle pulled the neckband
in too far - I might change that if it doesn't press out well.

That's it for this time!