Saturday, October 22, 2011

A Batch of Colorful Sewing Work

 Halloween is just around the corner, so I decided to have some fun "decorating."  With all the sewing orders I've had lately, though, all I had time to do was watch a scary movie with my younger son, who is a bit under the weather, and to change the ringer on my cell phone to that classic maniacal laugh that Vincent Price was so well known for.  Right after we finished the movie, though, I just about jumped out of my skin when my front pocket suddenly emitted peals of Grade B Horror Movie cackles - my other son was calling and I'd totally forgotten I'd changed the ringer.  Serves me right for watching Paranormal Activity 2 (and let's hear it for premature senility....).

Meanwhile, back at the Sewing Ranch...I did around a dozen kitty pads for a girl scout who is trying to earn her Gold Award collecting supplies and materials for a cat shelter.  One of the projects she was doing was making these kitty pads for them to put on shelving in the shelter in the play room.  Simple project - flannel outside in a long rectangle, batting on the inside for cushy comfort for nap attacks.  What wasn't so simple was the little bit of quilting they asked for so that the batting didn't shift while the pads were being washed.  I never expected that to be so difficult to get through the sewing machine - so yay again for having gotten the Janome with the walking foot. It was fun to look at the wild colors & whimsical prints she picked out:


After that was done, it was on to the onesies for Sweet Tart Lab, which I completely forgot to photograph.  Which is a shame, since one of the shirt styles isn't offered in their Etsy store but was really fun to sew as it involved a colorful mix of fabric patterns.  Maybe if I get to do that same style again, I can post a photo of one.  If you go to this link, though, you can see other shirts I've sewn there - aren't their designs cute?

Then back to the maternity clothes (which aren't in bright colors....yet - but stay tuned) until suddenly I got a call from my nephew's wife, desperate for help with her sons' Halloween costumes for a playdate.  She told me what she wanted to do, and why she couldn't get it done there, and we arranged for her to drive down the next day with the boys and the outfits.  Simple enough idea (and perfect for her boys), but difficult when you factor in how busy the boys are - one is in almost constant motion - and her lack of crafting supplies.  It's great to be the Auntie who is the resident Crafting Queen!  So not only did I get a wonderful visit by some people I really care about, I also got to "play":

These came out too cool!  Printed these out onto t-shirt
transfer paper, ironed them onto white cotton fabric,
ironed some fusible interfacing onto the back, and then
satin-stitched them to the turtlenecks she brought.

Our lovely victim model, Alex - wish you could
see the blue hair better, LOL!

Got an email from the Refashion Co-op - it's been so darned busy here that I haven't gotten around to any of my refashions and haven't posted there in a long while!  Thankfully, they're not going to turn me out on my ear!  So I managed to sneak in a couple of refashions yesterday and today, ones that I'd been meaning to get finished for quite some time.  I'll post the second one in awhile, but here is the first one:

Some 99 Cent Store t-shirts, along with
one wild print clearance t-shirt from Kohls and some
brown jersey fabric from the dollar bin at my local fabric store.
The Anthropologie inspiration.

A little bit of chopping, a lot of playing, and
I found a scheme I liked.  

Yes, things really do get this cockeyed in my workroom.
Serging the cut up swatches back together.

Match the seams from the cut up t-shirts when-
ever possible when sewing them back together.

Um, yeah.  Some of the panels I cut were
bigger than the other panels I cut.  But
not to worry.  As long as I don't forget, I
can serge down that side and cut off
the excess.

Serging that excess chunk off while running the
seam down that sleeve.


And onwards, down the sides.

Semi-finished.  Now for the hems and the
neckline trim - you don't have to settle for
whatever neckline the original t-shirt had.  Here I chose
to make it into a v-neck.  

Pinning a fabric band I cut from a t-shirt to the cut v-neck.
Here you can see the v-neck of the shirt spread apart until
it's almost a horizontal line.  It's a good idea to run some
stay-stitching around the neckline first.  I placed this seam right
into the v of the shirt.  In retrospect, I shouldn't have - it
made it a bit bulky for the next step.


When putting a fabric band onto a t-shirt, it's a good idea to
stretch the band, especially in the front.  That will help it
lay flat properly.

A little bit of stretch in the back neckline area.  Not quite
as much as in the front.

Matching the ends at the center back of the neckline.  Mark
with pins or chalk.  

Sew a standard seam with a regular sewing machine.

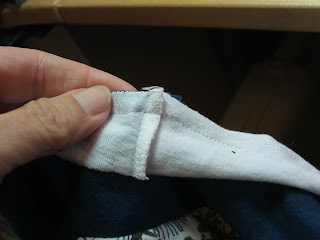
Open it and press it flat - helps to keep this area from
becoming too bulky.

Sew about a 3/8 inch seam while stretching the band (don't
pull too hard and stretch the t-shirt, too).

Stitching that v-neck which is stretched out horizontally -
now it's more obvious why the stay-stitching is so important.

Trim the seam down to about 1/4 inch all the way around.

Urgh.  That original seam is going to be too bulky - so I trimmed
that down before the next step:
Flip the neckband up.....

...and then over the seam allowance.  Pin it so that it sits just
beyond the seam stitching.

Notice my pins are on the inside.  That way I can make sure
I will catch the extra fabric in the next stitching.

From the outside, "stitch in the ditch" - as close to the
neckband as possible.  As long as you have left the heads of
the pins beyond the edge, you should be able to see them
and remove them before you break your needle attempting to
sew OVER them.  

And....even us more experienced seamstresses miss the
overlap sometimes.  No worries.  Pin again, and stitch again
over the last stitch line.  Check to see if you caught all the overlapped
neckband in your stitching.  

All the overlap is now caught in that stitched line - but you'll
notice that the v-neck is looking decidedly....round.  Here's
an easy fix:

Fold the shirt in half at the point of the v-neck, and take
special note of where your stitching is for the neckband.
That's where you want your next stitch line to end.  

Start from an angle - maybe not quite so acute as mine -
that could draw the front neckline in a bit too far.  Don't stitch
beyond the neckband stitch line - if you do, you'll get a strange looking
pucker at the point of the v when you're done.
Here is the finished t-shirt.  

A close-up on that cheater's miter.  Needs a good
pressing - I recommend pressing every seam,
every time - your work will look so much better.
This does look like the angle pulled the neckband
in too far - I might change that if it doesn't press out well.

That's it for this time!


Sunday, October 16, 2011

More Fun Around the Sewing Room

One of the last projects for the band that I've been working on - my first foray into draping/designing - drum major capelets (by special request).  I worked for hours on making sure the front drape worked necklace-style from shoulder to shoulder, and that the back cape part wouldn't impede the conducting:

 Started with a drum major jacket with the existing
baldric (sash) removed.  After figuring out where the scarf/drape would hang, I cut out fabric in the approximate shape of the drape I was expecting.

 Pinch-pleating on and off the form, looking at the drape on the jacket and making sure that everything was even and symmetrical.  Then I pinned everything into place because I had to move it from the cutting table into my workroom to sew it into place.


 The pleats weren't hanging quite right, so I pinned the fold further into the drape.  You can see the result on the jacket at this point.  When I sewed the top of the pleats, it was great - but when I tacked the drape where the second set of pins were, then it lost its definition for some reason.  So, out came those stitches.

Now for the back part of the cape.  They wanted it to fall in a semi-triangular fashion, so I needed a trapezoid of sorts to begin with.


Pinch pleating on this one was pretty simple, and then I just sewed it straight across.  Back onto the jacket, and then narrow hemming on all parts, then some gentle tweaks here and there to put it all together.  Here is the semi-completed cape:

From the back:  you can see I trimmed off the bottom
of the trapezoid - I think the squared off bottom looked
a little better than the point.

This is the finished cape/drape, pinned into place.

Whew.  Drove it over to the school just in time to drop it off with the drum majors, who were on their way to a field competition.  Gave them brief instructions on how to pin it to their jackets and had sent photos to one of their moms (so they could see the finished product for pinning).  Imagine my surprise when they appeared on the field with the capes over their shoulder, but the other side of the drape pinned underneath the arm. I thought they had misunderstood me, and it was kind of like a valance on a curtain rod that was falling off the wall on one side - the drapes don't quite hang right when they're not level. *Sigh.*  Turns out that they decided that they liked that look better.  I'm probably the only one who noticed or cared.  As long as they are happy and confident, that's all that matters.


Having some fun today working on some embroidery for a special order.  I'd read on the internet that working with onesies was difficult for a number of reasons, so I did some researching and I'm really glad that I did.  General consensus is that it's easier to do a onesie through the neck opening (which I definitely would never have thought of), and better with the water soluble topper, even though it's a flat knit.  It's also easier to hoop by hooping the stabilizer only, then applying the onesie with double sided tape, spray adhesive, pins, or something to hold it down until you can fix/baste it in place.  Loads easier than trying to turn the little thing inside out, stretch it over a hoop, and try to keep the rest of it from curling over itself.  Most important thing?  Never, EVER leave a onesie in the process of embroidering.  All kinds of wonkiness must ensue, since that was the one thing I saw noted repeatedly in my research.

Other than a matte thread that refused to work in the machine for some reason, the onesie stitched out really, really well and I was pleased with the results:

Inside out, through the neckhole - only moved my hands out of
the way to take a photo and then quickly held the neckline
again - all the vibrations & motion makes it collapse inward in a second!

The finished onesie - done in a font called Swirl - so cute!

Closeup of the stitching - if you look carefully, you can just see
the basting stitch holes around the name.  These came out in
just a few seconds by pressing with a warm iron.

After that, it was on to a Minky blanket.  I had to disassemble the blanket for about 10 inches or so from both sides of one corner in order to get it situated in the hoop properly.  I did hoop the fabric along with the stabilizer this time, I didn't want to take a chance that the blanket could shift unexpectedly while stitching.

Dark brown on one side, light pink on the other with raised
polka-dots.  Name stitched in dark brown in a font called
"Nimbus."  REALLY glad this didn't show hoop burn
after I worked the fabric a bit!

Still to come:  a couple of new maternity designs; about a dozen cat mats for a local girl scout project; and maybe another purse for myself or to sell.  Will have to see how that fits in with the orders I still have for this week!

P.S. - The final note on the replacement Lovey;  the mother recently sent an email to my friend, who forwarded it to me:

"Jackie,
Thank you so much. We were able to retire Addisons old lovie doll. I washed sewed and put it away for safe keeping for her when she gets older. We told her her daddy washed and sewed her baby and it was pretty.. she loves it and believes its the old one.. THANKS AGAIN..
I will also be sending my donation out this weekend.. Thanks!"

Now, THAT'S why I love doing what I do.  Just thought I'd share that with you!

Monday, October 10, 2011

The Final Count

Well, I knew it - if I posted finally being "caught up," then it would catch up to me in a big way.  But that's life.  It's what happens (at the speed of light) while you're planning other things.  And really, who would want to just sit and wait, and not be occupied, or not make a difference, or not help others to succeed?  Certainly not me - and I wouldn't have it any other way.

The final count for September:

  • 3 pantry curtains
  • 2 custom towel loops
  • 1 pillowcase repair
  • 1 blanket cover (sort of like a duvet, only one layer)
  • 1 t-shirt refashion (I have to figure out a way to get more of these into my schedule)
  • 2 pairs of pajamas
  • 4 pairs of pants hemmed and repaired
  • 2 appliqued onesie samples
  • 1 sample baby blanket
  • 1 baby blanket for a baby shower
  • 13 appliqued baby bibs
  • 1 35 foot by 35 foot veil (which the colorguard has dubbed "Veil-arie")
  • 2 specialty pockets for the marching band's soloists
  • shopping for fabric for the field blockout props (for colorguard to hide behind for their costume change)
  • 11 maternity dresses
  • 2 maternity tunics
Lots more coming down the pike - it's good to be busy.  I do suddenly realize why I'm so tired, though.  Like most people, I just need to figure out how to shoehorn in some "me" time.  If I'm sewing or crafting for myself, I can always claim that I'm a walking billboard for my business, right? 

Catching Up

Maybe I shouldn't title this post Catching Up - as soon as it's posted, I'm sure another avalanche of UFOs and work will appear from out of nowhere...

Got quite a few things done this week, and managed to find some band moms to help me with some of the more labor-intensive projects as well so I could actually get some sleep for a change.  Doesn't matter how much I get done, though, there always seems to be too much to do.  I think if I ever had a day completely free, I wouldn't know what to do with myself.  Nah, maybe I would - I'd probably spend half of it shopping to replace used notions & thread, and the other half trying to wade through all the undone things that have piled up while I've been so busy.  My family has gotten quite good at doing the dirty-dish-balancing-act in the kitchen sink....(cue circus music here).

First up: got the replacement Lovey done for that little girl who loved her old one to death.  Now it's up to the mom to figure out how to swap them out.  Still waiting to hear how that goes - if I get an update from my friend who does the Threads of Love projects here in Orange County, I'll put it in a future post.  Just hope it's successful, for both mom & daughter's sake.  Having a security like that is important when faced with medical procedures, tests, therapy, etc.

The old:
The way it was....

...and then became....

The beginning of the Remake

Adding the specialty stitching (with more on the hem of the hat).

The New and Improved Lovey.  

No matter how crazy busy it gets, I never feel quite right unless I'm doing at least one project for a good cause.  Now I need to get to the rest of the two or three bags of these Threads of Love items - I've really missed working with them.

Another hectic week with the band - after repairing the large field veil, I had to "outsource" the practice veil and the mini-veils, as my client work was getting pushed further and further behind.  Not good, since I had two big jobs to do for clients and another one coming down the pike any day now.  I got most of the maternity work done - here are a couple of new ones I hadn't worked on before:

An Ella dress, in navy jersey. 

Close-up of the cowl neck and the pleating.
Yeah, I know - sleeveless, with a big old cowl.
That would have driven me nuts when I was pregnant.
Too cold and too hot at the same time.


Here is an Erika dress, made with seersucker and
completely lined.  

My dressform is woefully UN-busty.  Poor Loretta.

Don't look at the stripes too long.  You'll get
a headache.  

Did three other dresses as well, but you've seen those already.

Picked up another order of onesies this week, also - I'll post photos of those when I get them done.  They are so cute they should come with a surgeon general's warning on them.  If you click on that link, you can see a couple of the ones I'll be working on (the Sweet Dreamy applique, a couple for boys and a couple for girls), along with two I worked up for her a couple of weeks ago (Grey and Pink Owl and Turquoise and Red Owl).  

Waiting for the snuggly blanket client to close up her co-op, and then I'll know how much work will be coming from that direction.  

In the meantime, I took a little time off last night to watch the marching band perform what they have so far of their show in their first competition of the season.  Took the camera, so you could see that giant grey veil in action, only I couldn't get my camera to behave very well with the stadium lighting.  I'll need to take it to Wednesday night rehearsal and fool around with it until I can get some better photos.  In the meantime, if all you remember is this, here are a few pics that will explain things a bit better.  Or not.  It's supposed to be mysterious, and I think we've nailed that part of it, anyway.

Setting up.

Oooo, pretty lights.

Round and round and round....kind of like a bizarre sort of Maypole.

The Unveiling (if you'll pardon the pun).

Colorguard dances with the fabric, which billows in a strangely
mesmerizing way.


And then carries it around the field. 

So, we've gone from a Lovey that's been carried around and loved to death, to a field show that features a different sort of fabric "creature" being carried around.  Let's just hope they don't love it to death.